Half toning is a powerful technique used in printing to create the illusion of gradients and smooth tones using solid colours. When done correctly, half toning can make your DTG prints look more dynamic, especially when you want to achieve a semi-transparent effect without compromising on print quality. In this guide, we’ll explore what half toning is, why it’s used in DTG printing, and how to apply it effectively for the best results.
What is Half toning?
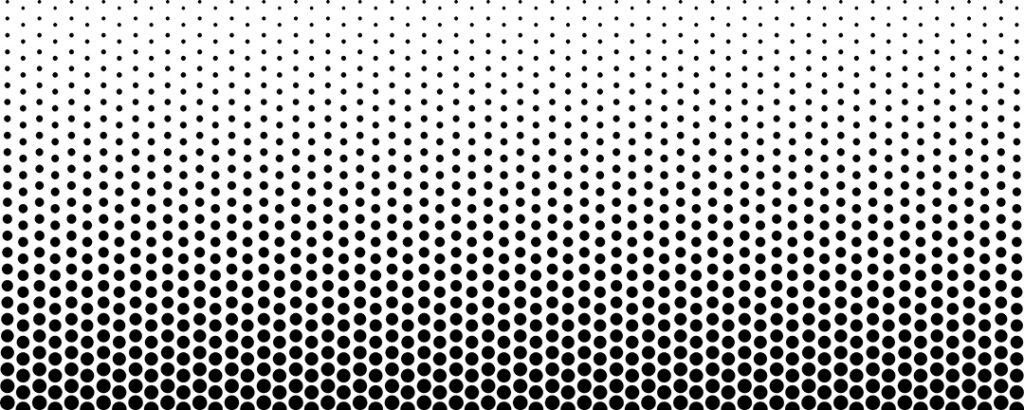
Half toning is a method used to create gradients by breaking an image down into a series of tiny dots of varying sizes and spacing. These dots can be arranged in different patterns to produce different effects, from subtle fades to detailed textures. By adjusting the size and density of these dots, half toning tricks the human eye into seeing continuous tones even though the printed image is made up of solid colours.
For example, instead of trying to print a light grey colour directly, half toning can use small black dots spaced apart on a white background to give the appearance of grey. The closer together the dots are, the darker the effect; the farther apart they are, the lighter it looks.
Why Use Half toning in DTG Printing?
Half toning is incredibly useful for DTG printing because DTG printers can struggle with semi-transparent colours. Using half toning techniques to simulate transparency helps you achieve beautiful gradients and smooth colour transitions without any loss in quality. This is especially helpful if your design includes:
- Shadows and gradients: Half toning helps maintain detail in shaded areas.
- Semi-transparent elements: Instead of applying a gradient directly, you can use half toning to make the transition more printer-friendly.
- Reducing ink costs: By using halftones instead of full blocks of colour, you can save on ink without sacrificing the visual impact of your design.
How to Create a Halftone Effect for DTG Printing
Creating a halftone effect can be done in most graphic editing software, like Adobe Photoshop or Illustrator. Here’s a step-by-step approach to creating halftones in Photoshop:
- Open Your Design: Start by opening your design file in Photoshop.
- Convert to Greyscale: If you are planning to create a black and white halftone, convert your image to greyscale by going to
Image > Mode > Greyscale. This step makes it easier to create the halftone effect. - Apply Halftone Filter: To add the halftone effect, go to
Filter > Pixelate > Colour Halftone. In the dialogue box, you can adjust the Max Radius to control the size of the dots. The larger the value, the larger the dots. - Adjust as Needed: Play around with the settings until you get a look that works well for your design. The goal is to create dots that vary in size to replicate the gradient effect you’re aiming for.
- Convert Back to RGB: Once your halftone pattern is complete, convert your image back to RGB (
Image > Mode > RGB) to ensure compatibility with DTG printers.
Tips for Better Half toning Results
- Consider the Fabric Colour: The colour of the garment will affect how the halftone dots appear. On darker garments, lighter halftone dots may get lost, so consider using halftones that provide enough contrast.
- Dot Size Matters: Larger dots may give a more graphic, retro effect, while smaller dots will create smoother gradients. Experiment to find the right balance for your design.
- Test Print: Halftones can be tricky to get right, so it’s always a good idea to do a test print to see how your design appears on the garment. Dots that look good on screen may appear differently when printed.
- Avoid Overlapping Dark Colours: Overlapping dark halftones on dark garments can result in a muddy appearance. Always ensure there’s enough contrast between your halftone and garment colours.
Examples of Half toning in DTG Printing
- Retro Designs: Half toning is perfect for retro-themed designs, giving that nostalgic newspaper print feel.
- Shading and Highlights: Instead of using gradients, use half toning to add dimension to your artwork while keeping the print clean and sharp.
- Pop Art Style: The pop art movement made extensive use of halftones for bold, comic-style visuals. You can use half toning to achieve similar effects for your t-shirt designs.
Choosing the Right Software for Half toning
While Adobe Photoshop is one of the most popular tools for creating halftones, you can also use other software like Illustrator, CorelDRAW, or even free options like GIMP. Each of these programs has different tools and features for half toning, but the fundamental process remains similar—creating dots that simulate different tones.
Half toning: A Powerful Tool for DTG Printing
Half toning is a fantastic way to add depth and interest to your DTG designs. By breaking up solid colours into intricate dot patterns, you can create visually stunning effects that make your designs pop. Whether you’re going for a retro look or need to add some nuanced shading, half toning is a versatile technique that can take your prints to the next level.